Quotes

Life is short, break the rules. Forgive quickly, kiss slowly. Love truly, laugh uncontrollably and never regret anything that makes you smile. - Samuel Longhorne Clemens (Mark Twain)

Wednesday, August 30, 2017

AWI Project - Fife and Drum Primed

I wanted to make a painted comparison of the Fife and Drum against the Perry plastics so I cleaned up and primed eight minis last night. I have been working on painting stick work of Perry's of and on for a while now so I'll see if I can catch up with the Fife and Drum minis. I want to get a feel for how quickly the two different brands actually paint up. I have heard that Fife and Drum paint up very quickly while the Perry's are kind of start and stop. One thing I don't like about plastics, in general, is that at some point the detail disappears and you are left guessing on how to approach something with the brush. That's definitely true on the AWI Perry Continental Infantry. Typical areas of soft detail are on the minis right side below the arm. The coat just kind of loses all semblance of detail when there is really a lot going on.

The Perry's are definitely a bit taller and overall bigger than Fife and Drum, I don't think that will really be noticed on the table as long as they aren't mixed in the same unit.


Continental Infantry in coats

Continental Infantry in hunting shirts

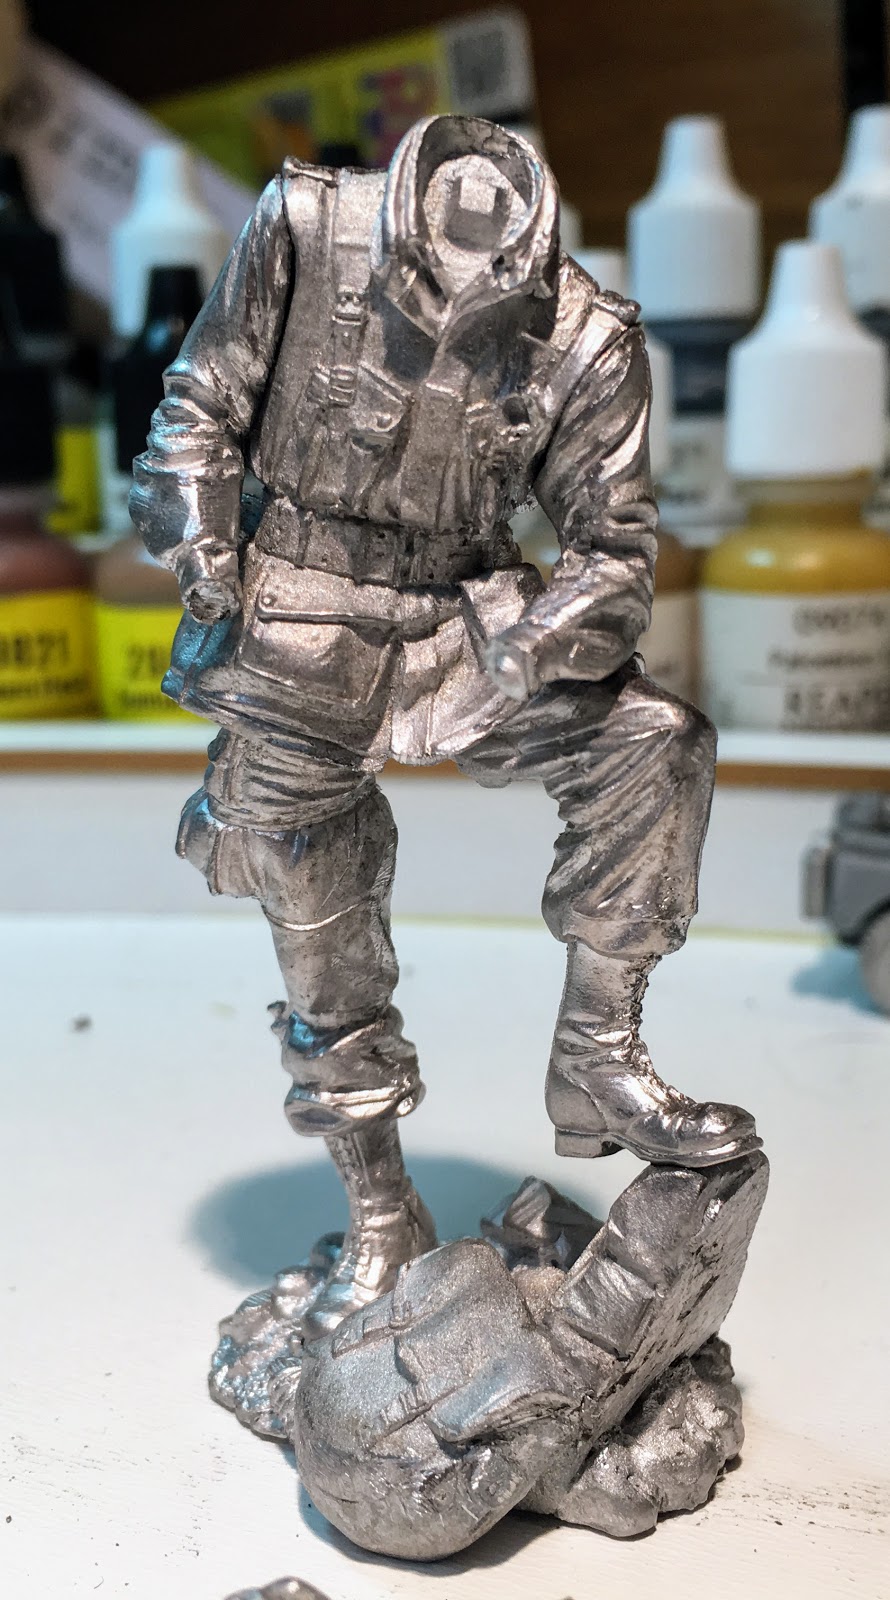
Primed and ready to go.


Tuesday, August 29, 2017

Random - Big Tire

I try not to use my phone camera on the road, but this load of tires was pretty interesting. I think these might be for those big dump trucks that work the open pit mines.


Monday, August 28, 2017

A Night at Mile High Stadium

This is my second visit to Mile High Stadium. The first visit was to see the Packers play the Broncos in an exhibition game way back in 2001 the first year it opened. My second visit was Saturday again to watch my Packers take on the Broncos. The end result was a 17-20 Packer loss but I did finally get a chance to see Aaron Rodgers play even it was only for two possessions. The first time I was in the south stands about half way up (below the huge jumbotron). This time we were nearly at the top of the stadium row 34 out of 36 but the view of the field was great and we were almost on the 50 yard line.


There he is, the Packers had the first possession of the game.

Lined up for the first snap

And Action!

A look at the elevation here in Denver

The sun is going down fast

I like the reflection off the horse

Sunset

The moon is visible by the 3rd quarter

Up and down these stairs is interesting, quite steep!

Wednesday, August 23, 2017

Reaper Con 2017 Project - Lt Dick Winters - Prepping

Reaper Con is edging every closer so I felt it was time to get my Scale 75 entry up and running. I did a quick once over of this kit a couple of months ago I think, some days its just hard to keep track of everything. Since its time for prepping I really gave this casting a good look and I can say that I'm not to happy with it.

From the top down, the head and helmet are fine although the helmet has quite a tab on the backside which not only has to be trimmed off but requires a little re-sculpting of the edge. Not a huge issue in and of itself but it could have been done better. The strap castings are okay, but there is a lot of flash on them, indications of a production mold starting to go bad. The body also has a lot of flash, again not a big deal, no detail is missing and its relatively simple to clean up with a knife and then a file. the only real issue with the body is the pitting of the metal across the back from shoulder to shoulder. The primer should be enough to cover this. I'll find out! The arms though, those are on the not good side of the equation. The right arm has flash and slipped, i.e. the mold didn't align properly and the arm is not cast quite correctly. I have seen worse and this wasn't so bad that I couldn't fix it. The same thing happened with the left arm and the Thompson SMG. The left hand, the grenade and the canteen are all fine. The base had a considerable amount of flash as well, again it just took more time than I expected it to.

Needless to say, prep time took a little longer than I expected. I then did as much assembly work as I could. In this case the body to the base and the arms to the body. I also glued the Thompson's strap in place and did some preliminary bending. Its close but I'll do the final adjustment once its actually glued to the body after painting is done. The head, helmet, left hand, right hand with SMG, helmet straps and the grenade will all be painted separately.

With assembly done I put it all in the booth and primed them in grey. Badger's Stynylrez grey primer has become my favorite airbrush primer at this point. I have a couple of other colors that I want to start experimenting with especially after watching James Wappel's videos, he has developed some very interesting techniques.

A few pictures of the evenings work:
I managed to get the box open without cutting myself. When I cleaned up the desk so I could use the new painting station I found the British Airborne Jeep that I have been looking for. One important note on the Hobby Zone Paint Station, it is a lovely white surface but it is not a cutting surface, you will scar it up pretty quickly if you don't use a cutting mat.

The pieces

The assembly


The rest of the pieces

Primed, sorry the lights are pretty stark in the airbrush booth, but he really is primed at this point.


I don't see any immediate flaws after priming so I think its okay to start the painting. I intend to do the initial work with the airbrush and then follow that with the brushwork.


Tuesday, August 22, 2017

Calamity Railroad Project - Thinking of Cabooses

I am off on another tangent. While looking at 1/56 scale armor on Shapeways I somehow came across running gear for a DSP&P RR waycar. I have been toying with the idea of building and actual C&NW RR caboose from plans that appeared in the Narrow Gauge and Shortline Gazette and this would provide a firm foundation on which to build that. If all goes according to plan, and rarely does that happen, then I would eventually build two of these and that portion of Calamity's railroad would be done. I have two of the Bachmann cabooses, one has been converted from and eight wheel to a four wheel caboose and the other is waiting for the same treatment. I just need to decide if I want to build or convert at this point.

The Shapeway parts were designed by Michael York and sold on Shapeways through the Oahu Railway and Model Company. He has some interesting parts and I would certainly recommend his work at this point.

DSP&P Waycar running gear. These waycars were flat roofed in the beginning and when taken over by the C&S had cupolas added. These should work well for some of the C&S cabooses


The original conversion from some 4 wheel running gear I stumbled across on eBay. Not quite right.
Back to the drawing board with some new wheels and Grandt Line pedestals


This looks much better with this parts. 

Wednesday, August 16, 2017

New Addition to the Family

We made the plunge and acquired a used puppy over the weekend. We have an older dog, Hobbes, who is not doing well. So obviously the best thing to cheer Hobbes up is a sweet young puppy to mentor.
Phoebe, 4 months, Great Pyrenees
We called the Pyrescue, where 4 out of 5 of the Pyrs have come from, and they did, fortuitously, have a stray puppy that had just arrived from somewhere in MO. We grabbed two of the other dogs, Hobbes can't really travel at this point, and traveled down to Peyton CO to make a visit.

Everyone managed to get along so we headed home with three dogs in the Jeep, so it was a bit crowded (fortunately we had elected to take one of the JK unlimited jeeps and not the red two door TJ).

Phoebe is about 4 months old, and is just starting to lose her puppy fur, so she is still very fluffy. You can see her adult coat starting to come in on her back. She is a very laid back puppy, but quickly managed to claim all the dog toys in the house as her's.

The rest of the clan


A younger picture of Hobbes, now somewhere between 10 and 13, Great Pyrenees

Sadie 8 years (and my son's dog so a frequent visitor), Catahoula Hound/Australian Heeler mix

Peyton, 5 years old, Flatcoat Retriever/Border Collie mix
Kahlani (Lani), 2 years old, Great Pyrenees/Anatolian Shepherd mix
She's a big girl too pushing 120# now.
Those that have come before


Porthos, Nov 1996 - Nov 2008, Great Pyrenees

Babe, July 1996 - June 2008, Great Pyrenees

The pair together, almost inseparable.
And Larry
Larry in the middle of the bed, Lani looking forlorn

Okay fine, you can have the bed if I can have a corner

Tuesday, August 15, 2017

ACW Project - The Cavalry Arrives - Nineteenth Century Miniatures

I took a big breath and pulled the trigger and ordered the cavalry I needed to play the first day of Gettysburg at the regimental level if I so desired. Its a lot of cavalry, I'm guessing that I won't need anymore cavalry unless I decide to do Brandy Station and someone else will need to provide the Confederate Cavalry for that one! The choice for these troops was between Blue Moon and Old Glory 15s from Nineteenth Century Miniatures. I put pen to paper and grabbed the calculator and figured out that the Old Glory 15s were the best deal for me, and yes I did calculate the army discount from Old Glory Miniatures, but since I didn't purchase it the first time through I had to add the $50 cost of that back in. It was made even easier since the bulk of my Union army is already made up from Old Glory 15s some dating back to the original production runs back in 90s when they were first released.

After much trial and tribulation on the shipping they arrived on Saturday. The shipping issue was totally my fault, I managed to merge my new address with my old address and created a brand new does not exist address. So the package was actually returned to Nineteenth Century after spending about a week in Denver. Fortunately I was watching the tracking information and sent the right address and Nineteenth relabeled the box and turned it around quite promptly so kudos to Nineteenth Century for covering my screwup.

I also took this opportunity to do a quick comparison in size between Blue Moon's "The Blue and the Grey" miniatures and Nineteenth Century's ACW Old Glory 15s.

Its not all cavalry. I filled out my artillery with 12# Napoleons, 3" Rifles and 10# Parrotts. There are also a four bags of infantry including a bag of Zoaves just for something a little different.

From the Cavalry Command package; bugler, officer and standard bearer

Also from the Command package; dismounted officer, standard bearer and bugler

From the dismounted cavalry package; four horses and a horse holder. Old Glory 15s only includes two horse holders and four horses total in a dismounted cavalry bag. Fire and Fury rules call for four horses but by just going with two horses per marker than I will have plenty of horse holders for the dismounted versions of each regiment.

On the left and Old Glory 15 horse holder, on the right a Blue Moon horse holder. Its a pretty significant difference and I had always considered Old Glory to be large. For this reason I'll probably just use Blue Moon miniatures for markers on the battlefield rather than troops.

On the left are the Old Glory 15 horses, on the left are the Blue Moon horses. Again noticeably bigger. I only ordered one bag of horse holders from Blue Moon through Old Glory Miniatures they should slot in just fine with the rest.


Monday, August 14, 2017

Painting & Modeling Tools - Paint Station

I have decided that I could get more painting and modeling work done if I wasn't isolated down in the workroom. This would require some kind of painting station that will be easy to transport from room to room. I found a nice one from Hobby Zone and discovered that I could get it through Amazon. I decided to give it a try and it arrived on Friday. I didn't have time to put it together till Sunday, but I things it going to serve the purpose. Another one that I was toying with was from Gamecraft Miniatures. It had a couple of extra things you could add to it and I decided that might defeat what I was trying to achieve so the Hobby Zone one won out. If I had to order from Poland that might have been a different story.

I like that the paint rack is not just a bunch of holes, but a long slot. I think that's a more efficient use of the space in a small area. I'll never use those holes for the brush holders though. I just don't store my brushes like that. I will have to clean up the painting desk a bit too, I want to be able to just slide it in and out of place without any disruption which means I have a desk paint rack that will have to go because its just to deep, which means I'll have to figure out something more space efficient to hold the rest of my paint. Probably a sheet of plywood cut to fit and some u channel of some kind will work or I can get lazy and see if there is something commercial that will fit the bill.

Here is a look at the new paint station assembly process:
Straight out of the box. Pretty well packed.

A single sheet of instructions.

The parts all laid out. The ones at the bottom are wings that go on the sides to hold in progress miniatures. I'm not going to use them they add to much to the total width and really don't serve a useful purpose, at least for me.

The piece of MDF is gently bent and glued into the slot, there is another one on the base plate. Seriously bend it gently it will work, if you bend it to hard its likely to snap, MDF has that tendency.

Fitting the top rack into the slots on the back wall. This one had to be done by sight though there are no marks to tell you exactly how it should go so I just made sure it was centered.

Then the bottom rack is glue into place. The instructions suggest using "paper tape" to hold things together while the glue dries. I thin they are actually referring to masking tape. I only had painters tape available, it worked but not as well as masking tape.

And from the other side. Remember the bigger rack goes on the bottom! I actually didn't make that mistake although it would have been a classic one for me.

Here I'm gluing a side piece into place and holding it in place with the painters tape. Larry is providing supervision at this point.

Everything assembled, just need to glue it to the base now. You can see the tan areas on the base plate, that's where the rack sub assembly is glued. The white surface is quite slick, although I'll still use some kind of cutting surface on top of it. I'm sure it wouldn't hold up to a lot of cutting.

Everything glued together, at this point the Titebond Glue that I use should provide enough strength to hold the base to the rack assembly, however, I'm considering adding some small screws from underneath anyway. I would use screws instead of nails because its MDF. Nails tend to split MDF, so some pilot holes and screws are definitely in order.

Still in the drying state. Those are the wing pieces that I don't think I'll be using. I might drill some holes in them and experiment with them as extra spots for water or maybe glue bottles.

Here's where it needs to live though, the basement work room:
There is a Horse Glider wing sitting on the paint rack in this shot. But that rack goes all the way to the back. Its a roll top desk so I can keep Larry off it when I'm not working.

To the right are the racks with other paints, minis, inks, basing material etc.

To the left, my main cabinet above the airbrush station. There is another cabinet to the right of this which is for long term storage as its a little harder to get to.
The main light for this used to be a florescent fixture, I recently replaced that with a 4200 lumens LED fixture, the difference is amazing.